Basketball Offense - Horns Offense
By Dr. James Gels, From the Coach’s Clipboard Basketball Playbook"Helping coaches coach better..."
Disclosure: This page contains affiliate links, which means that Coach's Clipboard receives a small commission (at no cost to you) if you make a purchase using these links.
This article discusses the Horns offense, or A-Set offense and coach Lason Perkins' excellent DVD the "Horns Offense". The popular Horns set is used by professional, college, and high school coaches - Mike D'Antonio, Rick Carlisle, Mike Krzyzewski, Tom Izzo, and many others. It has also been used successfully and extensively in Europe.
Lason Perkins is recognized globally as one of basketball's brightest coaching minds. He has coached at every level of basketball from elementary school to the professional ranks, and is the creator of many instructional basketball videos. He is a great student of the game with an expert understanding of Xs and Os, and maintains contact with coaches from around the world. Coach Perkins at this writing resides in Cary, NC and coaches basketball at Cary Academy.
In this DVD, Perkins first presents the basics of the offense, and then includes numerous detailed plays and options, and on-court demonstrations. Plays are categorized as (1) plays for your shooters, (2) pick and roll plays, (3) plays for your post players, and (4) a few additional "bonus" plays. A pdf document is included with play diagrams.
This article discusses the basics of the Horns offense and some of the many plays that coach Perkins includes on the DVD - get the DVD for the complete package.
"Horns Offense" with Lason Perkins
Horns Basic Actions
Basic Set Alignment - What's with the name "Horns", or "A-Set"
Take a look at the two diagrams below. The Horns alignment has both post players high near the arc on each side of the lane and when both set screens for the point guard O1, look like the "horns" on a bull. Some coaches favor the term "A-set" because the set looks a bit like the capital letter "A" (upside down).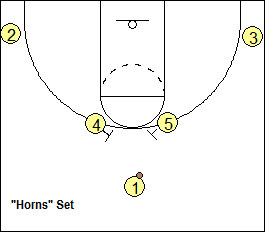
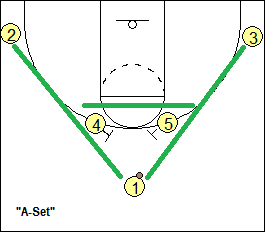
This is the basic starting set - O4 and O5 are high as the "horns", O1 usually starts in the middle, and shooters O2 and O3 are in the corners. You can run this offense against man-to-man and zone defenses. You get pick and roll action, shots for your best shooters, and the ball to your best post player. Horns works well from transition, and is easy to get into right off an inbounds situation.
High Pick and Roll
Diagram A shows a high pick and roll starting in the Horns set. O5 and O4 are screeners for O1, and O1 can pick either side and dribble either right or left around the high screen. Here O1 dribbles around O5 looking to score, and runs the pick and roll action with O5 rolling off the screen inside for a possible pass from O1. O1 can also kick-out pass to O3 for an open 3-point shot in the corner if the X3 defender drops inside to give defensive help. Notice that the opposite post O4 pops out on top.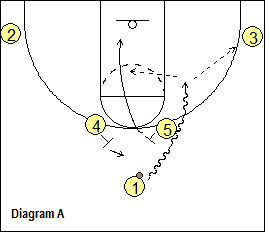
Hi-Lo Option
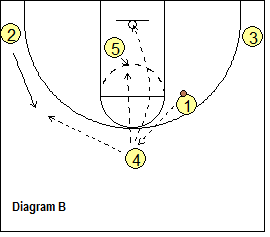
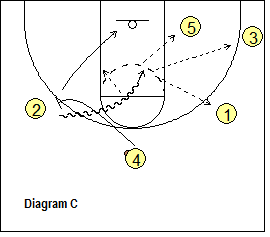
If none of the pick and roll or kick-out options is open, O1 passes back to O4 on top (diagram B). If he's a good shooter, O4 could shoot the 3-point shot. Or now O4 and O5 can work a "hi-lo" action with O5 posting up inside, getting the pass from O4. Feeding the post from the top (middle) is usually good as ordinarily there is no helpside defense when the ball is at the top.If this is not open, you could go into a standard 4-out or 5-out offense. But another option is this: O2 moves up to the wing, and O4 passes to O2, follows the pass and ball-screens for O2 (diagram C). Now we have pick and roll action with O2 and O4. As O2 dribbles around the screen, there are passing options to O5 on the opposite low block, or kick-out passes to either O1 or O3 for 3-point shots.
Opposite Roll
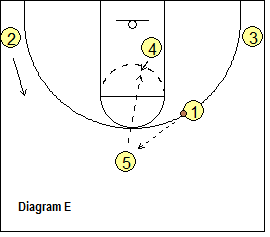
Diagram D shows the Horns high pick and roll. O5 and O4 are screeners for O1, and O1 can pick either side and dribble either right or left around the high screen. Here O1 dribbles around O5 looking to score. But instead of O5 rolling inside off the screen, we have the opposite post O4 cut inside for the pass from O1. After screening, O5 pops out on top and could get the pass from O1 and then run the hi-lo action with O4 posting up inside (diagram E). All the previous options are in play (O5 could pass to O2 and pick and roll with O2, etc).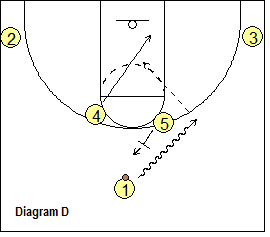
Post-Switch
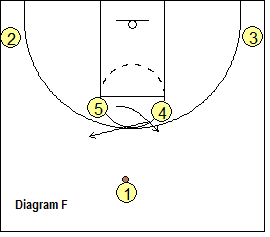
Diagram F. Here the post players O4 and O5 simply cross, switching sides, with O4 sliding over to O5's spot, and O5 looping under to O4's spot. This simple switch often confuses the post defenders and helps prevent the opposite post defender from hedging or helping against the pick and roll. All the same options as described above can now be run after this simple post switch.Side-Entry
Diagram G. O1 dribbles to either side and O4 and O5 set a double screen for O1. O1 dribbles around the screens looking to score or pass to the roller (here O4), or perhaps has a kick-out pass to O3 in the corner. All the same options are in play. O1 could pass back on top to O5 and then we look for the hi-lo action. You can designate which post player is your roller and which pops out on top. If one of the post players is a better outside shooter and the other stronger inside, then have the better shooter always pop outside while your stronger post player always rolls inside.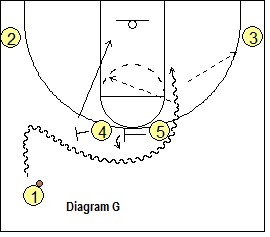
Post-Cross
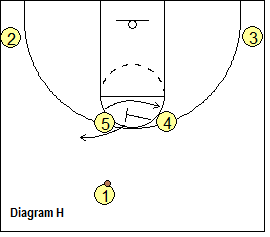
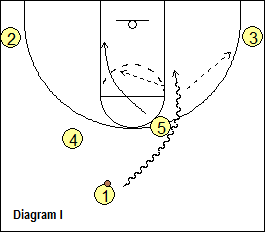
Diagram H. This is similar to the post-switch above except here instead of a simple switch, O4 cross-screens for O5. O5 loops under the screen and then ball-screens for O1 and runs the pick and roll (diagram I). O5 rolls inside while O4 pops out on top. Again, all the previous options are available.This completes the basic actions of the Horns offense. Next we will discuss a number of set plays that you can run: (1) plays for your best shooters, (2) pick and roll plays, and (3) plays for your post players.
Horns Plays for Your Best Shooters
"Spartan"
Coach Tom Izzo at Michigan State uses the Horns set at times and might run this play. We start in the Horns set (diagram J). O1 passes to O5 and then screens for O4. O4 cuts around the screen to the right low block. O3 cuts through underneath to the left low block area. O5 passes back to O1 (diagram K), who after screening for O4, moves back to the top.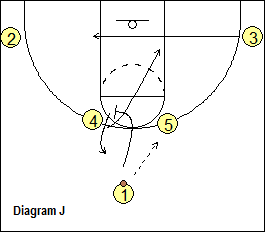
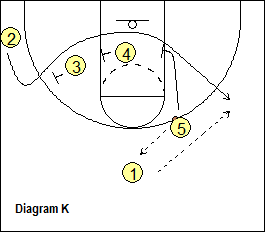
Meanwhile, O3, O4 and O5 set a triple staggered screen for your shooter O2. O2 initially steps up a little toward the wing to set up the cut, and then cuts hard around all three screens to the right wing and gets the pass from O1 and the 3-point shot.
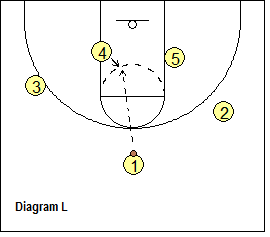
Slip option. If the X4 defender helps on the cutter O2, O4 slips and ducks into the middle for a quick pass from O1 and the inside shot (diagram L).
"Screen-Flare"
Starting in the Horns set, O1 dribbles right toward the wing (diagram 1). O4 down-screens for O2 and O2 cuts up to the top. O5 and O2 then set a double screen for O1, and O1 dribbles over the screens (diagram 2).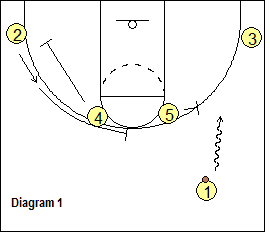
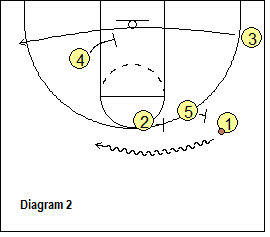
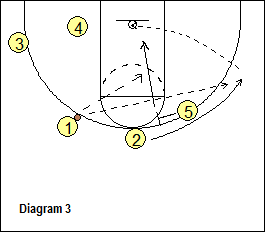
O4 screens for O3 and O3 cuts out to the left wing (this vacates the right side allowing for the spacing for our flare-screen action, and also occupies their defenders). O5 turns and back-screens for O2 near the top (lane line extended). O2 cuts over the flare-screen to the right wing for the over-the-top pass from O1 and the open 3-point shot. If the defenders switch the flare-screen, O5 slips the screen and cuts inside for the pass from O1, and the lay-up. It's very important that O5 set that flare-screen up high. If it is set lower toward the wing area, there will not be adequate spacing for O2 and the over-the-top pass.
Horns Pick and Roll Plays
"Flare"
Starting in the Horns set (diagram PR1), O4 screens for O1 and O1 dribbles over the screen toward the left wing. O5 then screens for O4 and O4 flares to the right wing, and this will occupy the defenders. O5 then ball-screens for O1 and we have the pick and roll with O1 and O5. O5 rolls inside. O1 looks to score, or could pass to O5 on the roll, or kick-out pass to O4 or O3 (diagram PR2).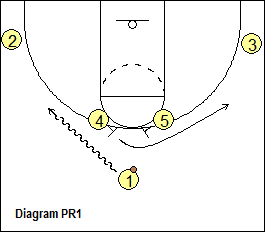
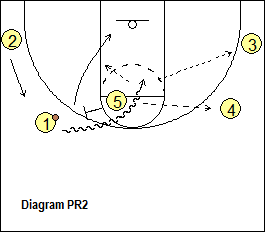
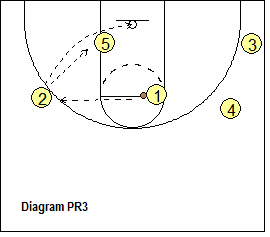
Notice that O2 rotates up to the left wing and could get the pass back from O1. O2 could then either shoot the 3-point shot, or pass to O5 posting up (diagram PR3).
"Barcelona"
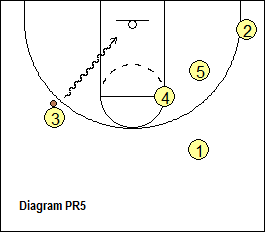
Starting in the Horns set (diagram PR4), O1 dribbles right. O5 and O4 set a double staggered down-screen for O3. O3 cuts over those screens to the left wing and receives the skip-pass from O1. Notice that O2 clears to the right corner. O3 now has the left side of the court to take his defender 1-on-1 and dribble-drive or create a jump-shot (diagram PR5).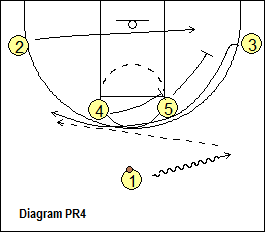
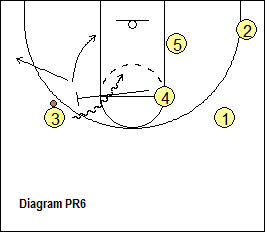
If not, O4 ball-screens for O3, and O4 and O3 run the pick and roll (diagram PR6). After screening, O4 has the option of either rolling to the hoop, or popping to the arc (if he is a good shooter).
Horns Post Plays
"Sonic"
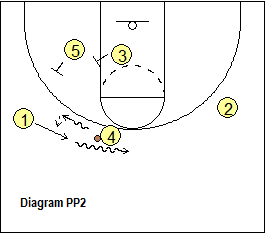
Starting in the Horns set (diagram PP1), O1 passes to O4 and O1 cuts to the left wing. O5 and O3 set a double screen for O2, and O2 cuts under those screens to the right wing. O4 dribbles at O1 and hands-off to O1 (diagram PP2). O1 dribbles to the top and passes to O2.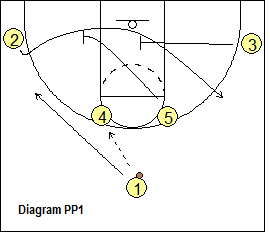
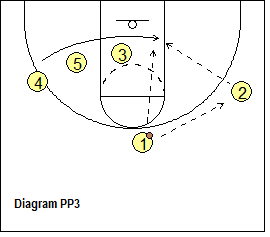
Meanwhile, O5 and O3 set a double screen for O4. O4 cuts under the screens for a pass from O2 and the lay-up (diagram PP3).
"Flex"
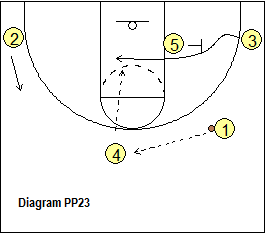
Starting in the Horns set with O4 and O5 opposite (diagram PP22), O1 dribbles over O4's screen to the right wing. O5 cuts inside to the right block and could get the pass from O1. After screening, O4 pops out on top and receives the pass from O1. O5 sets a flex-screen for O3 (diagram PP23). O3 flex-cuts inside and could get the pass from O4.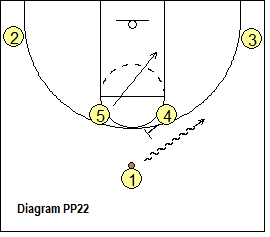
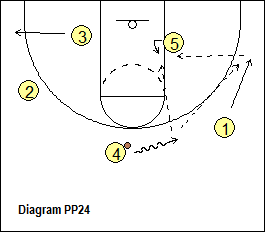
O1 moves to the right corner. O5 then shapes up to the ball (posts up) and O4 takes a couple dribbles to the right (for a better passing angle), and looks to pass to O5 inside (diagram PP24). If this pass is not open, O5 seals the X5 defender as O4 passes to O1, and then O1 passes to O5 inside.
Related pages:
Get 20 additional plays in Coach Perkins' Horns DVD, the Premium Members section and the Playbook download.
- 6 more plays for your shooters
- 3 more pick and roll plays
- 8 more post plays
- 3 Additional "Bonus" plays
- And a detailed Animation!


