Basketball Offense - 1-3-1 Offense
By Dr. James Gels, from the Coach’s Clipboard Basketball Playbook
Coach, looking for an organized library of helpful basketball information? Coach's Clipboard is a long-standing trusted basketball coaching resource used by coaches worldwide, at all levels - a basketball coach's encyclopedia.

The 1-3-1 offense is a simple offensive set, easy to learn, with good spacing, a high post and low post presence, and is a good choice for youth and middle school teams. For attacking man-to-man defense, several simple motion patterns and a few simple plays are presented below. We'll start with the most simple ("Motion-1") and end with a more detailed, advanced "Motion-3". Also read "Motion Offense Concepts".
The 1-3-1 set also works well in attacking 2-3 zone defenses, the most common zone defense that you will see. Having a single offense that will attack both man-to-man and zone defenses will certainly simplify things for younger teams, and teams that have limited practice time. Also see the simple 1-3-1 zone offense for attacking the 2-3 zone.
"Motion-1"
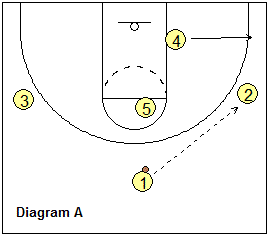
Using the 1-3-1 set, O1 is the point, O2 and O3 are the wings, O5 is high post and O4 is low block (diagram A). O1 starts the play on either side by passing to either O3 or O2. O4 moves to the weakside block (diagram B). O5 back-screens for O1. O1 cuts around the screen on the ball side. O3 could pass to O1 for a lay-up or shot.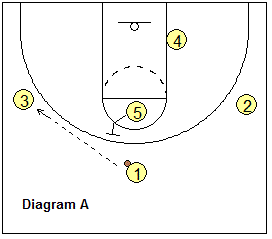
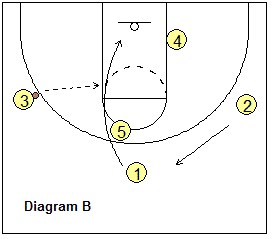
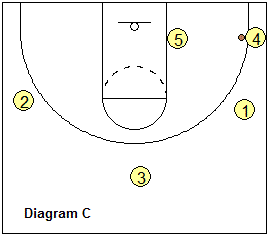
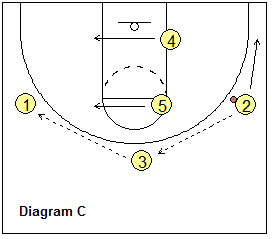
If O1 does not get the pass, he/she continues through and screens for O4 (diagram C). O4 cuts to the ball-side block to post up. Meanwhile, O5 drifts back to the free throw line, and O2 rotates to the point. O3 passes to O4, and O4 makes a post move for the shot. When O4 shoots, O1 should get weakside rebounding position. If the ball is passed out, O1 moves out to the right wing.
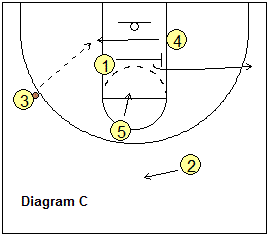
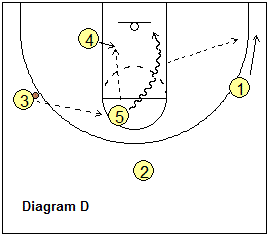
Diagram D - if O4 is full-fronted in the low post, O3 passes to O5 at the high post. O4 seals the X4 defender for inside position and steps into the paint for a pass from O5. Optionally, O5 could shot-fake and dribble-drive up the right lane line for a lay-up, with a kick-out option to O1 in the corner.
Options:
O3 can pass to the cutting O1, or to the posting O4, or to O5 at the free throw line, or back out to O2. Or O3 can take an open shot.
More High-Post Options:
Defenses may deny (overplay) the pass to the wing, so we pass to the high post instead. This is a good way to counter wing-pass denial and pressure. Notice in diagram HP-1, the wings are being overplayed - so O1 passes to O5. O3 takes his/her defender out high and then quickly back-cuts for a pass. On the other side, O4 can back-screen for O2.
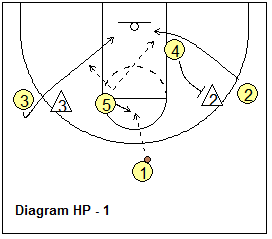
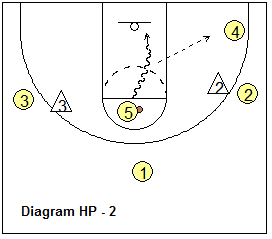
Diagram HP-2 - if O5 is athletic, let him/her shot-fake and dribble drive to the hoop for a lay-up. There should be no helpside defense when O4 moves out to back-screen for O2. So it's just 1-on-1 for O5 - simple stuff often works the best!
Diagram HP-3 - another option. Here, O3 doesn't get the pass and slides down to the corner. O4 screens for O2 and O2 cuts around O5 for a hand-off and drive to the hoop. Not shown here, if the X5 defender cheats over to stop O2 coming around O5, O5 fakes the hand-off and dribble drives to the hoop himself. You could also have O1 cut around O5 for the hand-off if that fits your personnel better.
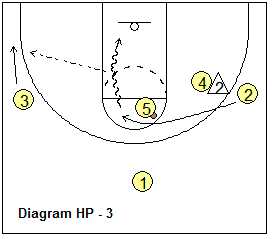
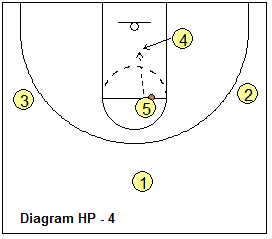
Diagram HP-4 - another simple option, good if your O4 can post up effectively. O4 cuts into the middle of the paint for the quick hi-lo pass from O5.
"Motion-2"
Run this motion offense against either man-to-man or zone defense.O1 is at the point, O2 and O3 are on the wings, O5 is high post and O4 is low block (diagram A). It helps to have a good 3-point shooting O4, as O4 may get the 3-point corner shot. Try to overload the zone. O1 starts the play on either side by passing to either O2 or O3. O4 sprints to the ball-side corner (diagram A).
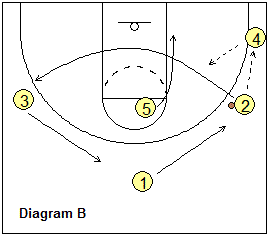
O2 passes to O4 in the corner (diagram B) and cuts through looking for a pass back from O4. If O2 does not get the pass, he/she goes on through to the opposite side and fills the O3 spot. O1 rotates over to the right wing, and O3 rotates to the point.
O5 waits until O2 has cleared through. If O2 does not get the ball, O5 then dives down to the low block for a pass from O4. The zone on the right side is now overloaded, and there are now 2-on-1 offensive opportunities.
The options are (diagram C): -- O4 can shoot the 3 pointer, pass to O5 on the block, or to O1 on the right wing. O1 could then shoot, or skip pass to O2, or reverse it back out to O3 on the point.
Reverse the ball
If there are no good options, reverse the ball quickly to the opposite side. O4 passes to O1. O1 passes to O3. O3 passes to O2. Or if the defense is over-shifted, O1 could skip pass directly to O2. O5 moves back up to the high post position (free throw line). O4 always follows the ball to the ball-side corner (diagram D).
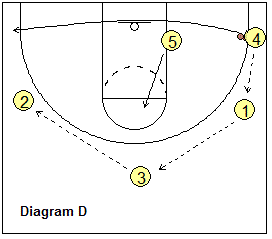
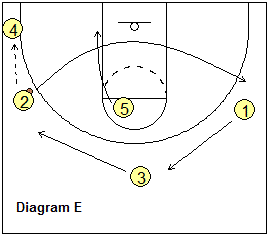
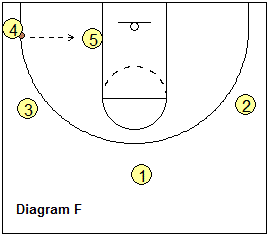
Diagram E. Now O2 passes to O4, and cuts through. If O2 doesn't get the pass, he/she goes to the opposite wing. O1 and O3 rotate back to the left. If O2 doesn't get the pass, O5 waits and cuts through to the block.
Diagram F. Now you have all the same options, except on the left side. O4 can shoot, or pass to O2 or O5 cutting, or pass back to O3 on the left wing. O3 could step up for a shot or skip pass to O2, or pass out to O1.
"Motion-3"
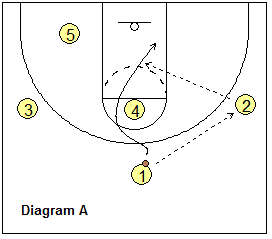
Run this against man-to-man defense. I like this set because there are so many simple, effective options and plays that you can run from this. These options use back-screens, screen-seal and roll moves, dribble-penetration with kick-out pass and "dump" pass options, ball-reversal, etc - all common and part of any motion offense. These things teach players how to "play the game", and when they get good at it, you won't even have to call plays, they'll just know what to do.O1 at the point (diagram A), passes to O2, and cuts around O4's screen (a "UCLA screen"). O2 passes to O1 for the lay-up. O4 seals the screened defender for inside position.
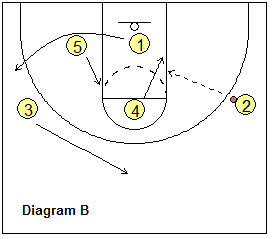
If O1 is not open, he/she clears out and cuts around O5's screen. At the same time, O4 should have inside position after the sealing on the screen (diagram B), and cuts to the hoop. O2 passes to O4 for the lay-up. Notice that if the X4 defender over-plays, switches and jams O1's cut, O4 could "slip" the screen and cut to the hoop for the pass from O2. O3 rotates out to the point. If O4 is not open on the cut, he/she moves to the ball-side low block position to post up. O2 can still try to pass to O4 for a post move. O5 flashes to the ball-side elbow. The pass could go to either O4 or O5.
If O4 or O5 are not open, the ball is reversed back to O3 (diagram C) and then to O1, or directly with a skip pass from O2 to O1. O4 and O5 slide across the lane to the ball-side. O1 can shoot the outside shot, or can pass inside to either O5 or O4. All of the previously described options are now available on the left side.
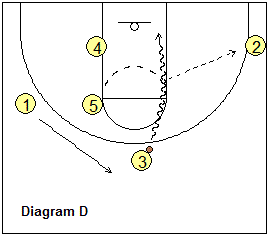
Optionally, in diagram D, we see a big gap created up the right side of the lane (after our posts moved to the left side). O3 can pass-fake to O1 and then dribble-drive this seam for a lay-up, with a kick-out option to O2 in the corner for a 3-point shot.
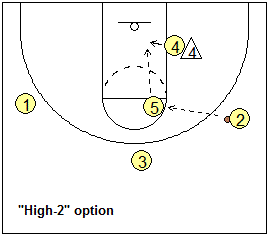
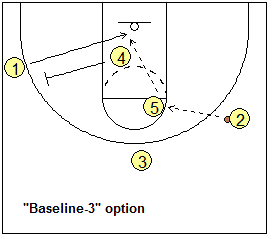
If at any time, O5 gets the pass in the high-post, run a "hi-lo" option such as "High-2", especially if the low post is being full-fronted (see diagram below). Or, run "baseline-3", a simple back-screen play with O4 back-screening for O1. O1 gets the pass from O5. If not open, O1 goes through to the short corner, and O4 seals and rolls back to the hoop for the pass and lay-up (see diagram below).
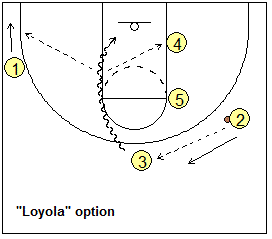
There are other options. O2 or O3 could take the outside shot if open. Or run the "Loyola play" play above. Both posts locate on the right side of the lane, and O2 passes the ball on top to O3. O1 slides down to the corner. This really opens the gap on the left side of the lane for a dribble-move by O3. O3 makes the left-handed dribble-move into the seam and could score, kick the pass out to O1 in the corner, or dump it across to O4.
Related pages:
- Motion Offense
- Simple 2-3 Zone Attack
- Loyola
- Baseline-3 (a simple back-screen play)
- Slip Play
- High-2 (hi-lo plays)


