Basketball Drills - Offensive Breakdown Drills for Attacking the 2-3 Zone Defense
By Dr. James Gels, From the Coach’s Clipboard Basketball Playbook"Helping coaches coach better..."
The 2-3 zone defense is the most commonly used zone defense, and it has been said that other zone defenses look essentially like the 2-3 zone after the first pass. You must have a plan for attacking the 2-3 zone. Read the articles on "Zone Offense" and "Attacking the 2-3 Zone". This article presents breakdown drills for teaching how to attack the 2-3 zone defense.
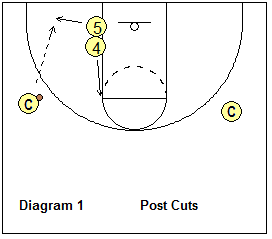
Posts Cutting and Passing Drill
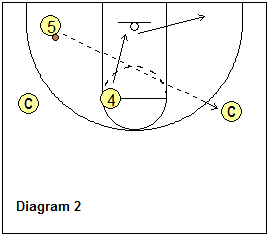
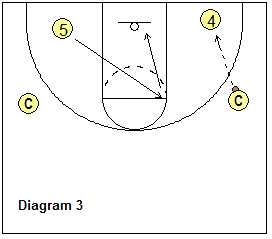
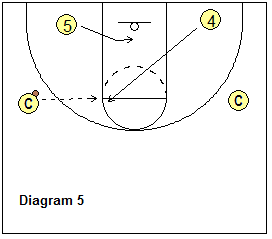
The two post players must learn to work together, and look for each other cutting inside. This drill starts with our two post players O4 and O5 in a stack on the low block (diagram 1), with a coach or assistant on each wing. O5 cuts to the short corner, while O4 cuts to the ballside elbow. The coach could pass to either, but here the pass goes to the O5 in the short corner.On the pass to the short corner, the high post dive cuts inside, looking for the pass from the short corner. O4 cuts inside (diagram 2), doesn't get the pass, and moves to the right short corner. O5 skip-passes to the coach on the right wing. O5 follows the pass to the ballside elbow (diagram 3).
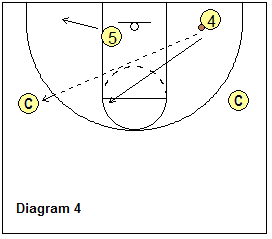
Next, the coach passes to O4 at the short corner. O5 cuts inside looking for the pass, and moves to the opposite (left) short corner (diagram 4), as O4 skip-passes to the left wing. O4 follows the pass, cutting to the ballside elbow (diagram 5).
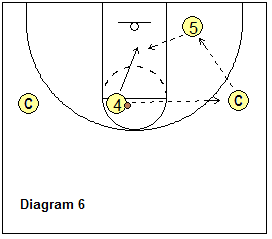
This time, the coach passes to the high post O4. This pass triggers our short corner post O5 to basket cut, looking for the hi-lo pass from O4. In this case, we are assuming the hi-lo pass is not open, so O4 passes out to the right wing (diagram 6), and O5 clears to the opposite short corner. Now the coach yells "Score!", passes to O5 in the short corner, and O5 passes to O4 cutting inside for the lay-up.
3-on-2 Guard Drive and Kick Drill
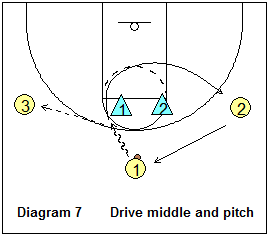
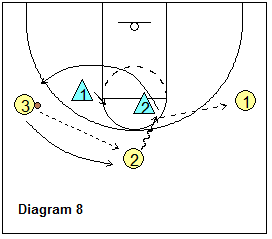
If the point-guard dribble attacks, this will engage one of the top defenders, and allow for an open kick-out pass to the wing. Use this 3-on-2 drill to bring the point home.In diagram 7, O1 dribbles at X1, and then kicks the pass over to O3. Meanwhile, O2 rotates to the top, and O1 fills out to the right wing. O3 passes to O2 at the top. Now O2 attacks X2 (diagram 8) and then passes out to O1 on the wing. O3 fills the top spot and O2 moves to the left wing. O1 passes to O3 (diagram 9) and O3 attacks with the dribble and kicks the pass out to the wing. You can do this several times and then allow the 3-point shot.

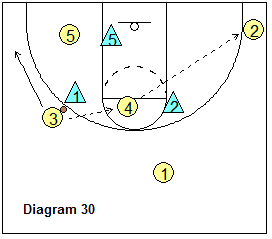
3-on-2 Triangle Drill
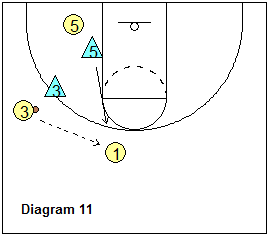
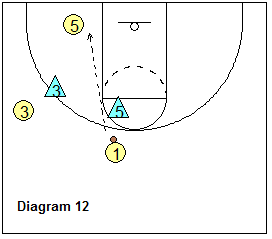
This drills reinforces the idea of looking to the get the ball inside. Start with three players on offense and two on defense (diagram 10). O1 passes to O3 on the wing, X3 comes out to defend, while X5 sags toward O5. O3 passes back to O1 (diagram 11) and X5 sprints up. O1 looks for O5 cutting to the hoop (diagram 12).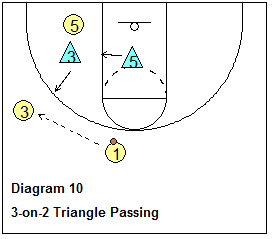
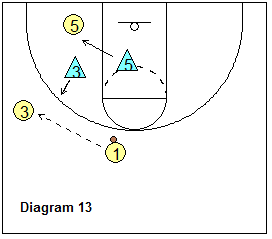
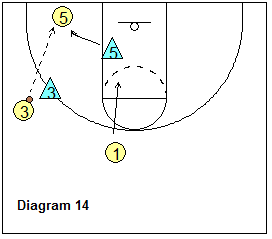
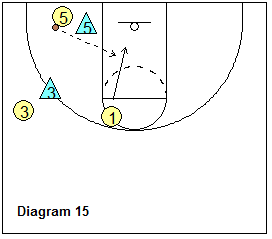
Now we reset and again O1 passes to O3 (diagram 13). This time we pass to the short corner (diagram 14), drawing X5 out. O1 basket cuts for the pass from O5 and the lay-up. Run several reps of each option.
4-on-3 Drill
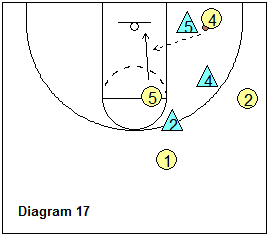
This strongside drill once again reinforces the tandem movements of the short corner and high post players, and gets perimeter players to look for the post players inside. In diagram 16, O1 passes to O2 on the wing, which causes X4 to come out to defend. O2 passes to O4 (short corner) and X5 moves over to defend O4. O5 dives inside from the high post spot for the pass from O4 and the lay-up (diagram 17).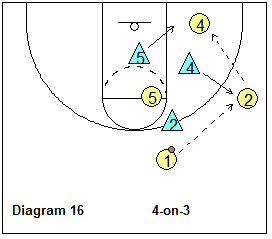
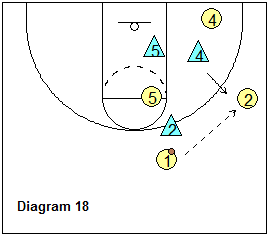
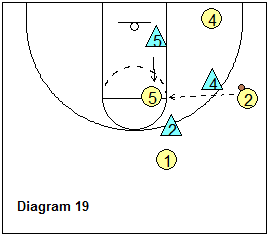
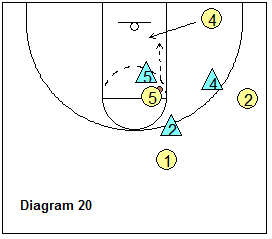
We reset, and O1 passes to O2 (diagram 18). This time O2 passes to O5 at the high post (diagram 19). X5 comes up to defend. O4 cuts to the hoop for the hi-lo pass from O5 and the lay-up (diagram 20).
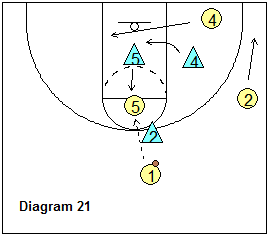
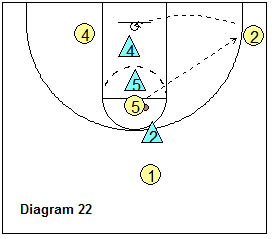
We reset and this time O1 passes to O5 at the high post (diagram 21). This triggers O4 to basket cut, taking the X4 defender inside. O2 drops down to the corner and will be wide open for the pass from the high post, and a 3-point shot (diagram 22).
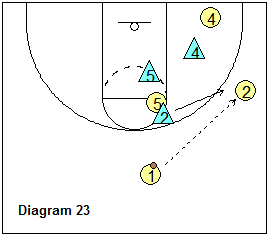
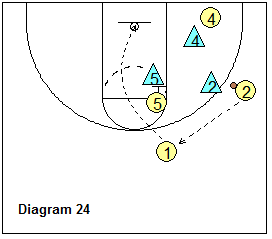
Finally, we'll get O1 a wide open 3-point shot. In diagram 23, O1 passes to O2. O5 seals (screens) the X5 defender inside. O2 passes back to O1 for the uncontested 3-point shot (diagram 24).
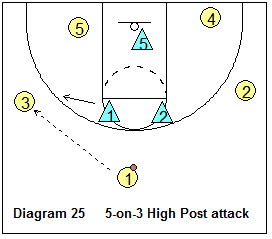
5-on-3 High Post Drill
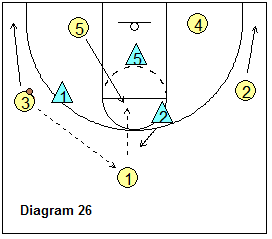
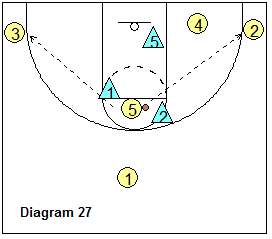
Good things can happen when the ball gets into the high post. We might get the hi-lo pass inside as already discussed, or our high post player might have an easy open jump shot. Another option is to have both wings slide to the corners for a pass from the high post. This is often a difficult "cover" for the outside low defender and can result in wide open corner shots for our best shooters.Diagram 25 starts with O1 passing to O3 drawing X1 to the left wing. O3 passes back to O1 on top, drawing the X2 defender (diagram 26). Meanwhile, O5 flashes up to the high post for the pass from O1. O3 and O2 move down to the corners. O5 could pass to either corner for the open shot (diagram 27).
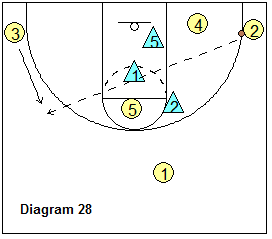
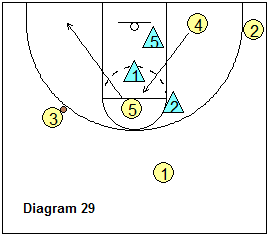
But to continue the drill, O2 does not shoot, and instead skip-passes to O3 cutting up to the opposite wing (diagram 28). The post players make their cuts (diagram 29), O5 to the short corner, and O4 to the ballside elbow. O3 passes to O4 at the high post and cuts to the left corner. Once again, we have the high-post to corner pass options for an open corner shot.
After we have made a couple shots from the corner, the outside low defender might cheat out toward the corner. Here, our high post player with the ballpass-fakes to the corner, and instead, passes directly hi-lo to the low post player for the inside shot. This brings up another point - two of the best things you can do against zone defenses (and any defense), is pass-fake and shot-fake.
5-on-5 Drill
Use this drill to run the "whole" of your zone offense, with all of your options. You can run your standard zone offense(s), and also mix in zone plays. Make sure that every shot is followed by aggressive offensive rebounding for second and third shot opportunities. Offensive rebounding should be big part of good zone offense. If you play 2-3 zone defense, you can also use this drill to work on your 2-3 zone defense, having one coach watch the defense, while you watch the offense.Related pages: