3-Out, 2-In Read and React Offense
By Dr. James Gels, From the Coach’s Clipboard Basketball Playbook"Helping coaches coach better..."
Disclosure: This page contains affiliate links, which means that Coach's Clipboard receives a small commission (at no cost to you) if you make a purchase using these links.
The Read and React offense was developed by coach Rick Torbett (BetterBasketball.com). See Rick Torbett's Betterbasketball Read and React Offense for the complete package. Also, this article will only make sense once you have learned the basic tenets of the Read and React offense, its rules and layers.
The Read and React can be run from multiple offensive sets (5-Out, 4-Out 1-in, or 3-Out 2-in). The basic rules of the offense are the same, no matter what set you use.
In fact, you can easily go from one set formation to another in the same possession without calling anything from the bench. So if your players and coaches already know the Read and React offense, there is nothing new to learn - just some minor adjustments.
In this article, I will discuss how our varsity boys team uses the Read and React offense in a 3-out, 2-in set. Again, the basic rules are all the same, but here we will look at it specifically from the viewpoint of the 3-out set, and the things that we find unique to that basic set.
First, why use the 3-out, 2-in set? For us, it comes down to having two good post players who work well together. We like having two strong rebounders on both the offensive and defensive ends. With the 4-out and 5-out sets, you give up some rebounding strength. Also, some "bigs" just don't have the perimeter skills required to play 4-out or 5-out.
3-Out, 2-In "Spots"
Diagram 1 shows the perimeter spots that can be filled. The 3-out offense uses the same perimeter spots as the 5-out read and react offense. Diagram 2 shows the spots most commonly used by our post players.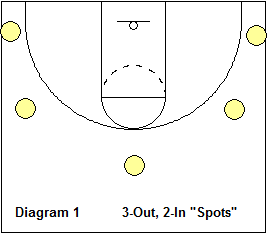
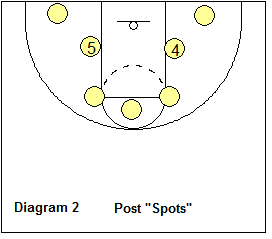
We start with our posts above the block on both sides of the lane. If your posts get too low, there is no spacing for a drop-step move to the baseline - they'll get caught too far under the basket with a poor angle for scoring.
Post players can move to the various spots seen. They can screen for each other and have considerable freedom of movement. The only hard and fast rules are the dribble-penetration post slide rules - and these rules have already been learned, nothing new. But we will review them below.
Pass and Cut Layer
The basic Read and React pass and cut rules apply with the 3-out set. If you pass, you must basket cut, the exception being the skip-pass. The skip-passer stays and does not cut, but this is also nothing new.Point-guard pass and cut.
Diagram 3 shows the point guard O1 passing to either wing. O1 cuts through to the basket, looking for a pass back from the wing. If the pass is not there, O1 cuts out to either corner. A curl cut around the ball-side post player (O4) might result in a pass from O2 for an open shot. The opposite wing O3 circle rotates to the top.
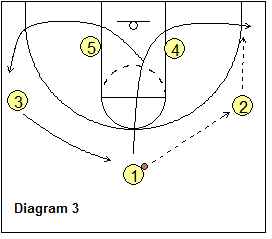
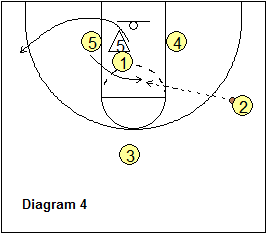
Diagram 4 shows another cutting option: before cutting out to the opposite arc, O1 screens (or "bumps") the X5 defender freeing up O5 for a quick pass inside from O2.
Wing pass and cut.
There are a number of options available to our wing cutter, after passing back to the top. Diagram 5 shows both posts low and O2 cuts to the elbow looking for a pass from O1, and then cutting out to the opposite arc. We like our wing cutter to hit the elbow on this cut, for better spacing.
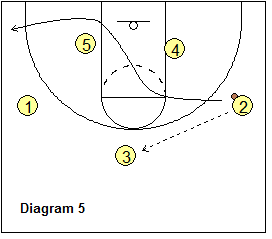
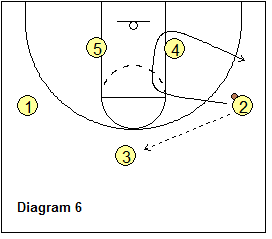
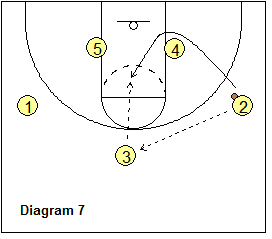
Diagram 6 shows O2 cutting to the elbow again, but here O2 curls around O4 for a possible pass from O3 and an open shot. Diagram 7 shows O2 cutting baseline and curling around O4 for a pass from O3.
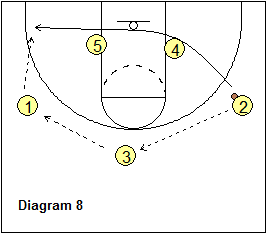
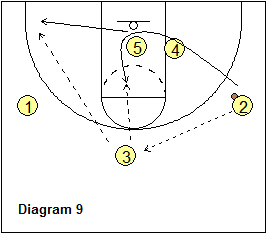
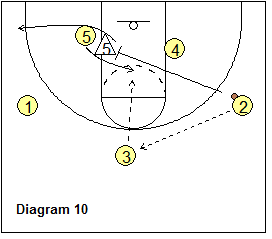
Diagram 8 shows O2 cutting under baseline double-screens from O4 and O5 with ball-reversal. In diagram 9, O5 steps into the lane and screens there for O2. Now O2 either flares to the opposite corner (if the X2 defender goes over the double-screen), or curls around O5 (if X2 chases around the screens). Diagram 10 shows another good option. O2 cuts hard right at the X5 defender and screens for O5, who cuts for the pass from the top.
Pass and Cut with a High-Post Screener
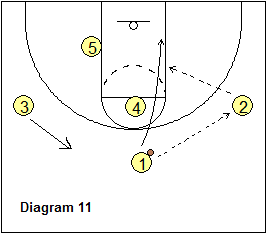
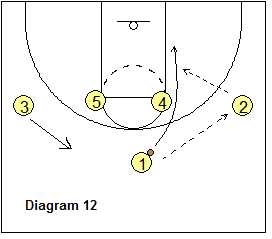
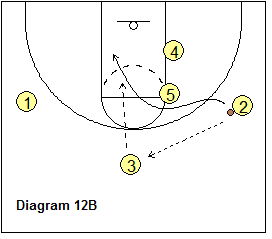
Either post player can move up to the high post. Diagram 11 shows O1 passing to the wing O2 and cutting off O4's screen (a "UCLA" screen and cut). This might work even better if we bring both posts up to the elbows (like a 1-4 high set). Diagram 12 again shows the wing pass and cut around O4. With both posts high, there might be less defensive help inside.Diagram 12B shows the wing O2 passing to the top. O2 cuts around O5's high-post elbow screen for a pass from the top.
Post Passing and Cutting
Common to all R&R sets, after passing into the post, perimeter players must cut, whether a high-post or low-post pass.Point to high-post pass.
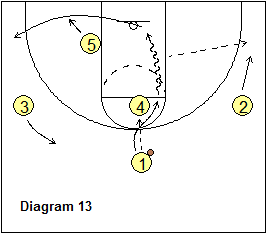
Diagram 13 shows O1 passing to O4 at the high-post. O1 cuts around O4 for a possible hand-off and dribble-drive. Or, this might be a Laker cut around O4 and a short "dump" bounce pass to O1. O2 circle rotates toward the corner as O3 rotates to the top and O5 slides to the short corner. O2 might get the natural pitch pass and O3 is the safety.
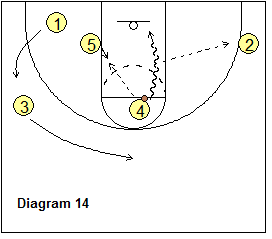
If O4 keeps the ball (diagram 14), O1 cuts out to the opposite arc. O5 posts up for a possible hi-lo pass from O4. Our athletic O4 might fake the pass, or shot-fake, and dribble-drive to the hoop. Again, O2 would be the natural pitch kick-out and O3 would be in the safety position.
Wing to post pass.
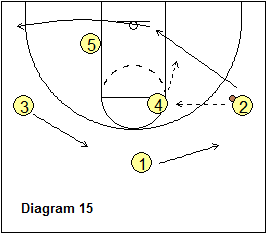
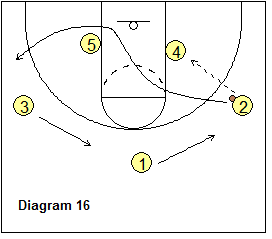
Diagram 15 shows a wing pass from O2 to O4 at the high-post. O2 cuts hard, baseline side for a possible pass from O4 and a lay-up. If the pass is not there, O2 cuts out to the opposite arc. O1 and O3 circle rotate. On a wing pass to the low post (diagram 16), with the high-post empty, O2 Laker cuts high to the elbow and then through to the opposite arc. O1 and O3 circle rotate.
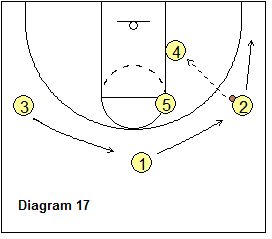
Another option after passing to the post is to simply relocate. Diagram 17 shows O2 passing to O4 in the low post. Here, O2 slides down to the corner. This might be a better option especially if O5 is occupying the high-post. Of course, O2 could also Laker cut low on the baseline side to the opposite arc, although the spacing might be limited here.
Dribble-Penetration/Post-Slide Rules
On first glance, you might think that with two post players inside, there would be very little opportunity for dribble-penetration. But just the opposite is true, because of the Read and React post slide rules. These are the same rules as for every R&R offensive set, and are simple:(1) a dribble from the top seam => both posts slide to the short corner.
(2) a dribble-drive from the baseline => both posts slide up to the elbows.
On these post slides, our post players must move immediately and quickly as the perimeter player puts the first dribble on the floor. They must slide to those spots quickly, not only to get out of the way of the dribbler (spacing), but also to make themselves available for a pass from the dribbler.
Point-guard dribble-penetration.
Diagram 18 shows a dibble-drive from the top by O1. Both posts slide to the short corners, allowing spacing for the dribble attack, and O1 might be able to get to the hoop for a lay-up if neither post defender gives help.
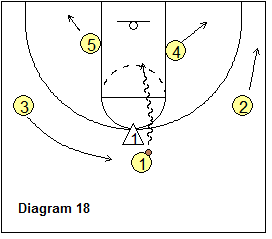
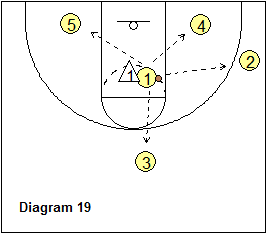
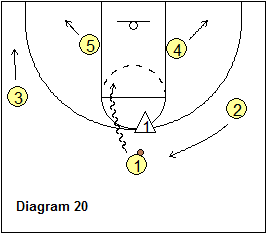
Diagram 19 shows that if either post defender gives help, O1 could dump a pass to the post player vacated by the helpside post defender (O4 or O5). Note that O2 and O3 circle rotate - O2 is the natural pitch from O1, and O3 is in the safety position. Diagram 20 just shows the same thing with O1 dribbling left around X1 - here the post slides are the same, but the circle rotation goes left.
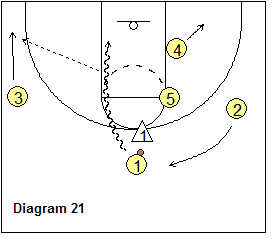
Diagram 21 shows a great scoring opportunity with both posts on the right side. This essentially clears out the left side for a dribble-drive by O1. O3 rotates down to the corner area for the natural pitch pass as O2 rotates up to the top.
Wing dribble-penetration. This can be either baseline or from the top.
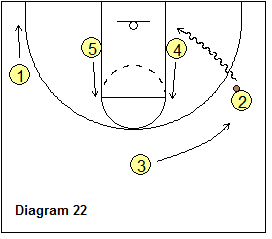
Baseline wing dribble-penetration. Diagram 22 shows O2 attacking along the baseline. Both posts O4 and O5 slide up to the elbows (or a step higher). O1, now on the opposite wing, slides down to the corner. This fulfills another standard R&R rule... the opposite corner is always filled on a baseline drive, and this is the natural pitch for the dribbler. O3 (on the top) circles behind as our safety.
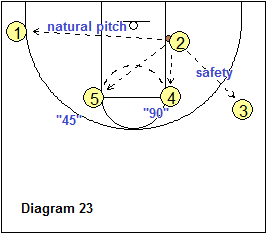
When done correctly, diagram 23 shows all the spots filled - O1 is the natural pitch across, O5 is at the 45 degree spot, O4 is at the 90 degree spot, and O3 is the safety.
Wing top dribble-penetration. Either wing (here O2) may dribble-drive attacking the elbow area (diagram 24). According to the post slide rules, O5 and O4 slide to the short corners, as O3 and O1 circle rotate left. One difference here with the 3-out set is that our ballside post player O4 makes an "advanced" post slide and circles out and behind O2, and is our safety pitch back out (diagram 25).
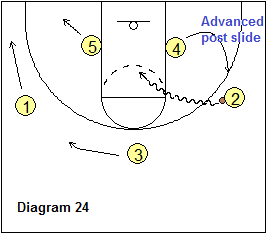
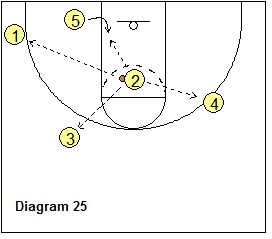
O2 also has kickout passes to either O1 or O3, or a dump pass inside to O5 if the X5 defender gives help. One other 3-out set adjustment here - notice that O3 slides left but not all the way to wing, as we must have one player on top as a defensive safely in the event of a turnover or missed shot.
See the complete article in the members section.
SIGN UP NOW FOR MEMBERSHIP! The complete article also includes:
- Dribble-at / Back-cut
- Back-screens / Multiple Staggered Screens
- Pin and Skip
- Ball-screens - Pick and Roll
- Using Set Plays
- Attacking Zone Defenses
- And a detailed Animation!
Related pages:
- Notes on the Read and React Offense
- Read and React Offense Breakdown Drills
- Notes on the Read and React Zone Offense