From the Coach's Clipboard Basketball Playbook

If your main man-to-man offense is a 4-out, 1-in motion offense, you may find these 4-out zone offenses helpful in attacking zone defenses. You can stay in your 4-out set, but run it a little differently against zones. A 4-out zone offense would also be helpful if you have a shortage of post players (foul trouble, injury, etc). Several 4-out zone plays are included.
41 Patterned Zone Offense
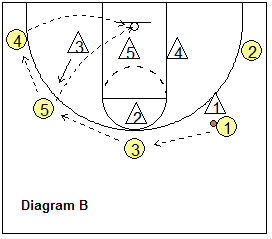
This 4-out set zone offense has a pattern and continuity. The diagrams below show this offense vs a 1-2-2 zone defense. O1 and O2 are on the top, and O3 and O4 are at the wing-corner areas (diagram A). O5 starts on the weakside low block. O1 dribbles at X1 and X2 (trying to get both defenders to commit). O5 flashes into the middle of the paint, and O1 could pass there.


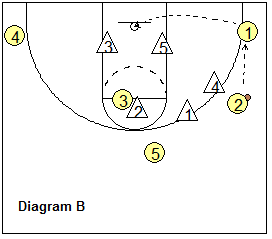
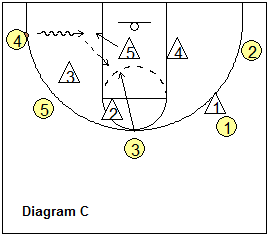
Notice that O3 has also crept down to the weakside low block. Let's say O1 passes to O4. The X4 defender will probably come out to guard O4. O5 cuts to the ball-side low block and posts-up for the pass from O4. If nothing is open, O4 passes back to O1 (diagrams B and C). Now O3 flashes to the middle of the paint and O5 slips back to the weakside block. O1 could pass to O3 in the paint or, if X5 defender comes up with O3, O1 could make the lob pass over the top directly to O5.
O3 could shoot or pass to O5 on the opposite block (diagram D). Now let's back up and say the pass from O1 to O3 is denied (diagram E). O3 cuts back outside and avoids a 3-second call. The ball is swung over to O2 and then to O3. O5 posts-up on the ball-side block (diagram F) while O4 slips down to the weakside block.


As the ball is passed back out to O2, O4 flashes to the middle of the paint while O5 slips to the weakside low block (diagram G). The pass could go from O2 to either O4 or directly to O5. O4 could shoot or pass to O5 (diagram H). If the pass from O2 to O4 (or O5) is denied, O4 cuts back out to the corner, O5 moves to the weakside block (diagram I), and the ball is passed from O2 to O1. We are now in the same setup that we started with in diagram A. We can continue to run this pattern until something is open. Or we could go into our "Corners" offense (below).


41 "Corners" Zone Offense
This 4-out zone offense is less-structured than the patterned offense above, and is easy to teach. The diagram shows the basic 4-out set that is used against any zone defense. It is different from our 4-out motion offense in the way we run it. In the 4-out motion offense (vs man-to-man), we pass, cut, screen, etc. In 41 "Corners", we do more quick outside passing and the post player inside follows the ball. We can dribble-drive the gaps too.
The post player moves as the ball moves.
When the ball is on top (O1 or O2), O5 is at high-post, ball-side elbow area. When the ball is on the low wing, corner (O3 or O4), O5 moves down to the ball-side low post. If the ball is passed to O5 at the high post, O3 and O4 could back-cut to the hoop if being denied, for a quick pass and lay-up.
Perimeter players should keep the ball moving with quick passes, including skip passes. By reversing the ball back and forth, we can stretch the zone and make them tired chasing the ball. Patience is a key.
Quick perimeter passing, reversing the ball from side-to-side, and skip passing should eventually cause the zone to become over-shifted and out of position. This creates open shots, chances to pass into the post, and opens gaps that our outside players can attack.
Against the 1-2-2 zone, O5 should be able to get open between the two defenders at the high post, or by cutting into the center of the paint (in the middle of the box created by the four defenders). Also, we pass into the corners. When the low defender comes out, O5 dives to the ball-side low block looking for the quick pass from the corner.
Against the 1-3-1 zone, O5 may have an easier time getting the ball down on the low block, since there is only one low defender. This offense creates alignment problems for the 1-3-1 zone as we have O1 and O2 on either side of the top defender, and our corners O3 and O4 are set lower than their outside wing defenders, which should cause problems for the wing defenders. Here too, we pass to the corners and look to shoot or pass inside to the low post.
Against the 2-3 zone, O5 has a better chance to get the pass inside at the free-throw line or in the gap just below the elbows. Since there are three inside defenders, it's difficult to post up on the low block. However, if the ball is in the corner and the outside low defender goes out, then O5 should dive to the ball-side low block looking for the pass.
See the animated diagram (4-Out Zone Offense).
4-Out Zone Plays
The first three plays are run out of the Corners 4-out offense vs the 2-3 zone defense, and are so simple that I call them "Larry", "Curly" and "Mo". Often it's the simple things that work the best. If your team has good 3-point shooters, these simple plays will help get open 3-point shots.
41 Zone Play - "Larry"
In our "Corners" 4-out set, O1 passes to O2 in the corner (diagram A), which gets the low outside defender X4 to come out and guard O2 (who is a good shooter). O2 dribbles up to the free-throw line extended, lifting X4 up, as O1 cuts inside and to the ball-side corner. O2 passes to O1 in the corner (diagram B), and usually O1 will be open for the 3-point shot.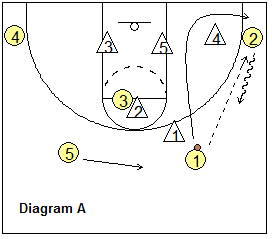
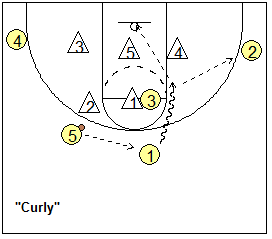
41 Zone Play - "Curly"
In the "Corners" 4-out set, we initially pass the ball to O5 and get the X2 defender to guard O5 (see diagram above). Usually the 2-3 zone has X1 deny the pass into the high-post, so we have our high-post player O3 pin-screen X1. O5 passes back to O1 and O1 dribbles around the pin-screen for the open pull-up jump shot. If the X4 defender comes up to stop O1, O1 passes to O2 in the corner for a 3-point shot.41 Zone Play - "Mo"
In our "Corners" 4-out set, O1 dribbles a little toward the right wing and O5 moves toward the left wing. O1 dribbling right engages X1, so X2 has to defend the next pass to the top. O3 (at the high post) steps out on top and gets the pass from O1 (diagram B).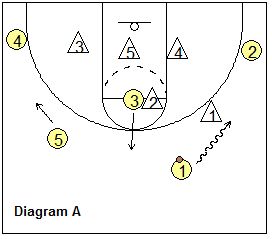
O3 quickly swings the ball to O5 (left wing). Now the X3 defender has a problem: either we get an uncontested 3-point shot from O5, or if X3 closes-out on O5, O5 passes to a wide-open O4 in the corner. O4 can shoot the 3-point shot, or attack the baseline with the dribble for either a pull-up jump-shot or a power lay-up against the X5 defender. After the ball is swung to the corner, O3 dives inside and could get a pass inside from O4 (diagram C).
41 Zone Play - "Corners 52"
In our 4-out "Corners" offense, O1 passes to O2, while O5 slides up and screens X2 (diagram A). O3 slides down to the corner. O4 cuts underneath the zone to the ball-side block. O2 dribble-penetrates the seam, looking for a pull-up jumper (diagram B), or a pass to O3 in the corner (if X3 drops inside), or a pass to O4 cutting underneath the zone (if X5 comes up to defend).

The following plays "Stack", "Star", "Wing Flash", and "Weak", are used to attack the 2-3 zone defense. These plays were submitted by Mark Lane.
41 Zone Play - "Stack"
O1 passes to O4 (diagram A), and O4 dribbles left to get the zone to shift. O3 and O5 double-screen the low right defender X4 inside (diagram B), as O2 cuts along the baseline to the right corner.O4 passes back to O1. O1 dribbles right and could pass to O2 in the corner for a 3-point shot. Otherwise, if the X4 defender moves out to O2, O5 screens the middle low defender X5 (diagram C) and O3 cuts into the open slot for a pass from O1, and the inside shot.


41 Zone Play - "Star"
A simple play, O4 pin-screens the top left defender X2 (diagram A), and O1 dribbles around the screen attacking the gap. There are a few options here.O1 might have an open pull-up jump shot just inside the left elbow. If the outside low defender X3 moves up to stop O1, O1 could pass to O2 in the corner for a 3-point shot. If X3 stays low but X5 moves up to defend against O1 (diagram B), O1 passes inside to O5.


41 Zone Play - "Weak"
This play is similar to "Star", but here O5 starts on the weakside (left) low block. O4 cuts through to the opposite (right) block. O5 moves up and pin-screens X2, and O1 dribbles around the screen, attacking the gap. As in "Star", O1 may have a pull-up jump-shot, or O2 may be open in the corner for a 3-point shot, or O4 could get open inside for the pass from O1.


41 Zone Play - "Wing Flash"
O1 passes to O4 (diagram A), and O4 passes to O2 in the corner. O3 flash-cuts to the ballside elbow (diagram B), and O5 cuts underneath the zone to the ballside short-corner and gets the pass from O2.Once O5 gets the pass, O3 dives inside for a quick pass from O5 and a lay-up (diagram C). Also O1 cuts to the weakside block and might be open if the X4 defender slides over to defend O3.


Want More Coaching Content?
Get access to more complete articles, diagrams, and coaching tools with Premium Membership.
View Membership Options