SIGN UP - MEMBERSHIP!
"Helping coaches coach better..."
These breakdown screening drills are helpful for teaching the "Blocker-Mover" offense, and other motion offenses that use screens.
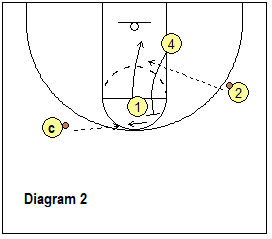
2-ball option. Diagram 2. You'll get more shots up with this option. Have a coach with a ball. After the cut, the wing passes to the cutter for the lay-up, and the coach passes to the screener O4 for a shot. I like the extra ball and shot because it reinforces the idea that it's often the screener who gets open after the screen - by shaping up, popping out, slipping the screen, etc. The screener should be ready to catch and score.
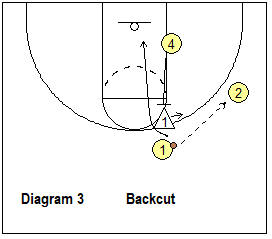
Add a defender option. Diagram 3. X1 defends O1 and denies the front-cut around the UCLA screen. O1 backcuts instead for the pass. Again, you can add the option of the coach passing to the screener for a shot.
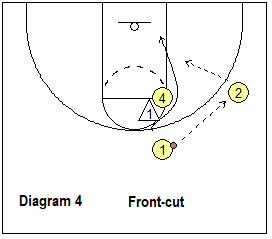
Diagram 4. X1 defender gets caught by the UCLA screen, so O1 makes the front-cut. After several reps of these prescribed defensive actions, let the defender go live and decide how he/she wants to play the screen so that the cutter must read the defense and make the correct cut.
Add a defender option. Diagram 7 shows a defender X3 denying the curl cut, so O3 fakes the curl and backcuts for the pass and lay-up. Diagram 8 shows the defender being caught by the screen and O3 makes the curl cut.
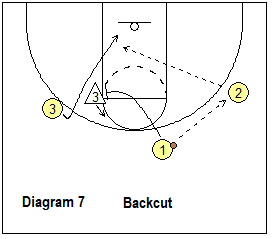
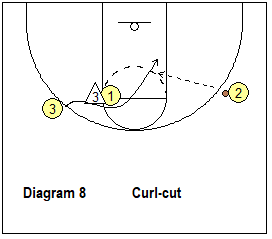
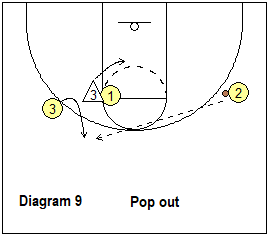
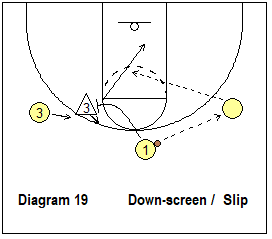
Diagram 9 shows the X3 defender sliding below the screen, so here O3 pops out for the pass and 3-point shot. Diagram 19 shows the slip option where the screener O1 slips the screen and gets the pass from the wing. Finally, go live and let the defender decide how to defend so that the offensive players learn to read and react to the defender.
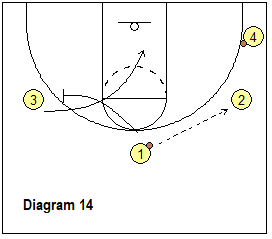
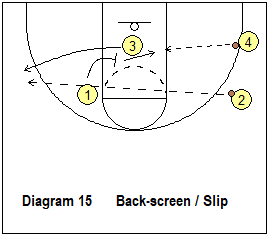
Here we use two right perimeter players. The corner player O4 has an extra ball. Diagram 14 shows the screen-away drill with O1 passing to O2, followed by a screen-away for O3. O3 curl cuts. Diagram 15 shows O1 (after the screen-away) re-screening with a pin-screen for O3. O3 cuts out to the wing for the skip pass from O2. O1 slips the screen and gets a pass from O4 for a shot.
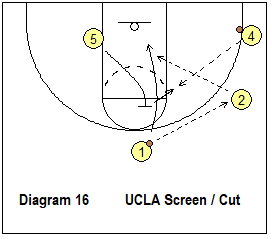
UCLA screen. Diagram 16 shows O5 starting at the left low block with two right perimeter players again, O4 with a ball. O1 passes to O2 while O5 sprints up to make the UCLA screen for O1. O1 cuts and gets the pass from O2 for a lay-up, while O5 gets a pass from O4 for a shot from the elbow.
As shown in some of the drills above, you can always add a defender or two to each drill, and also a coach who makes a pass to the screener for an additional shot.
Motion Offense (Blocker Mover) Screening Drills
By Dr. James Gels, From the Coach’s Clipboard Basketball Playbook"Helping coaches coach better..."
These breakdown screening drills are helpful for teaching the "Blocker-Mover" offense, and other motion offenses that use screens.
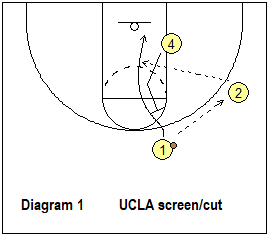
UCLA Screen and Cut
Diagram 1 shows O1 passing to the wing and then cutting off O4's UCLA screen. Run this to both sides with a pass to the left wing and a UCLA screen at the left elbow.2-ball option. Diagram 2. You'll get more shots up with this option. Have a coach with a ball. After the cut, the wing passes to the cutter for the lay-up, and the coach passes to the screener O4 for a shot. I like the extra ball and shot because it reinforces the idea that it's often the screener who gets open after the screen - by shaping up, popping out, slipping the screen, etc. The screener should be ready to catch and score.
Add a defender option. Diagram 3. X1 defends O1 and denies the front-cut around the UCLA screen. O1 backcuts instead for the pass. Again, you can add the option of the coach passing to the screener for a shot.
Diagram 4. X1 defender gets caught by the UCLA screen, so O1 makes the front-cut. After several reps of these prescribed defensive actions, let the defender go live and decide how he/she wants to play the screen so that the cutter must read the defense and make the correct cut.
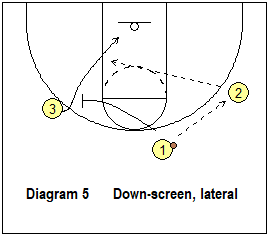
Screen-Away Down-screen and Cut
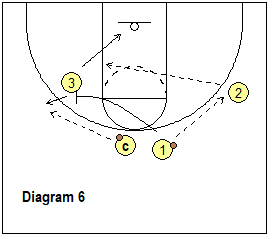
Diagram 5 shows O1 passing to the wing and then setting a screen-away for the opposite wing. The cutter can either curl-cut or fake a curl and back-cut. Diagram 6 shows the same drill with the 2-ball option with a coach passing to the screener for a shot. Add a defender option. Diagram 7 shows a defender X3 denying the curl cut, so O3 fakes the curl and backcuts for the pass and lay-up. Diagram 8 shows the defender being caught by the screen and O3 makes the curl cut.
Diagram 9 shows the X3 defender sliding below the screen, so here O3 pops out for the pass and 3-point shot. Diagram 19 shows the slip option where the screener O1 slips the screen and gets the pass from the wing. Finally, go live and let the defender decide how to defend so that the offensive players learn to read and react to the defender.
Flare-screen and Cut
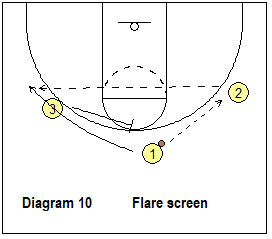
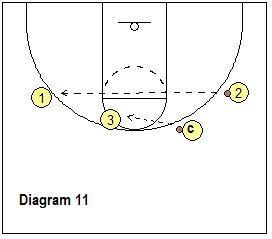
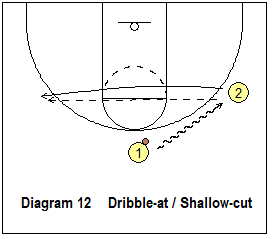
Diagram 10 shows O1 passing to the right wing, while the opposite wing O3 sets a flare-screen (back-screen) for O1. O1 cuts over the screen to the wing for the skip pass and shot. Diagram 11 shows the 2-balls option with a coach passing to the screener for a shot. Dribble-at and Shallow Cut
Diagram 12 shows O1 dribbling to the right wing. O2 makes a shallow cut to the opposite wing for a skip pass. After the skip-pass O1 lane cuts for a pass back from O2. You can add the 2-ball option with a coach passing to O2 for a shot. 4-Perimeter Players - 2 screens
Add some drills that sequence more than one screen or action.Here we use two right perimeter players. The corner player O4 has an extra ball. Diagram 14 shows the screen-away drill with O1 passing to O2, followed by a screen-away for O3. O3 curl cuts. Diagram 15 shows O1 (after the screen-away) re-screening with a pin-screen for O3. O3 cuts out to the wing for the skip pass from O2. O1 slips the screen and gets a pass from O4 for a shot.
UCLA screen. Diagram 16 shows O5 starting at the left low block with two right perimeter players again, O4 with a ball. O1 passes to O2 while O5 sprints up to make the UCLA screen for O1. O1 cuts and gets the pass from O2 for a lay-up, while O5 gets a pass from O4 for a shot from the elbow.
2 screens - Flare-screen to Down-screen
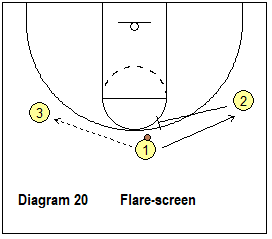
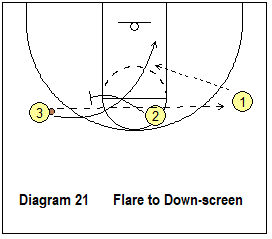
Diagram 20. O1 passes to the left wing. O2 flare-screens for O1 who cuts to the right wing. Diagram 21. O3 skip passes to O1, as O2 next sets a screen-away, down-screen for O3. O3 curl cuts for the pass from O1. Shallow cut to Down-screen
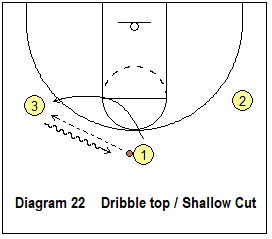
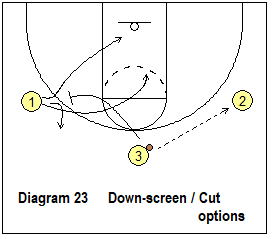
Diagram 22. O1 passes to the left wing O3 and shallow cuts to the left wing. O3 dribbles to the top and then passes to the right wing O2 (diagram 23). O3 then turns and sets a screen-away for O1. Diagram 23 shows the various options again for O1, depending on what the defender does. O3 could also slip this screen. As shown in some of the drills above, you can always add a defender or two to each drill, and also a coach who makes a pass to the screener for an additional shot.