


Basketball Defense - Match-up Zone Defense
By Dr. James Gels, from the Coach’s Clipboard Basketball PlaybookDisclosure: This page contains affiliate links, which means that Coach's Clipboard receives a small commission (at no cost to you) if you make a purchase using these links.

Match-up zone is a combination defense, combining elements of man-to-man defense (on ball), and zone defense (away from the ball). It's a zone defense that acts a lot like a good man-to-man defense. The on-ball defender closes-out and plays tight like in man-to-man. The zone away from the ball resembles man-to-man "helpside" defense. Be sure to see the detailed animation and Coach Sar's 1-3-1 Match-up Zone.
Quote: "A good zone looks like a man-to-man, and a good man-to-man looks like a zone." The match-up zone resembles what we used to call a "switching man-to-man", where defenders switch freely with one another, so that your defensive big men stay down low and your quick guards are on the perimeter.
An advantage of the match-up defense is that it may confuse the opponent in trying to figure out what defense you are playing. Also, it may affect the offense's basic set and get them out of their usual comfortable set. With the match-up, you can show a 2-1-2 formation, which may force the offense to go with a 1-3-1 or a 3-out, 2-in set.
If you show a 1-3-1 or a 1-2-2 match-up zone, the offense may change to a 2-1-2, or 2-3 set. So you may be able to put them into something they are less comfortable with. As in any aggressive man-to-man defense, pressure the ball at all times, front the low post, deny the passing lanes, and give help on inside penetration.
Now let's look at some defensive sets and how to match-up. You can create your own match-up rules so long as your players all understand and know the coverage patterns.
2-1-2 Match-up Zone
Refer to Diagram A. Here your 2-1-2 match-up faces a 1-3-1 offense. You see in the diagram how your defensive players match up with the offense. X1 takes the point (O1), and X2 gets the right wing player (O2), while X3 comes out to pick up the left wing (O3)


Refer to Diagram B. The 2-1-2 match-up zone faces a 3-out, 2-in offensive set. The coverage pattern is identical to that in Diagram A, except that X5 drops down to the low block and picks up O5.
One guard defensive front match up zone (1-3-1 and 1-2-2 sets).
By using either the 1-3-1 or 1-2-2 set, you may be able to force the offense out of their usual 1-3-1, or 3-out, 2-in offense and into a 2-1-2 or 4-out set.
1-3-1 match-up zone vs 2-1-2 offense (diagram C).
X1 picks up the guard to his right and X2 gets the other guard. X3 drops down to get the player in the corner and X4 gets the opposite corner. X5 has the middle.


1-2-2 match-up zone vs 2-1-2 offense (diagram D).
Again X1 and X2 pick up the two guards (O1 and O2) and X3 gets the wing-corner (O3) on his side. X4 picks up the opposite corner (O4) and X5 moves up to defend the high post (O5).
Match-up zone vs 1-4 Stack Offenses
Matching up vs the 1-4 stack offense (diagram E), X2 plays the gap between O2 and O4, and X3 plays the gap between O3 and O5. Both of these defenders can try to deny the pass to the wing and help when the ball gets to the post player at the elbow. If X2 (or X3) gets beaten by the back-cut, then X4 (or X5) must recognize this and pick up the cutter, while X2 (or X3) slides over to pick up the post player (O4 or O5) that was vacated by the switch.


Matching up against the 1-4 low stack offense (diagram F), X2 plays the gap between O2 and O4, and X3 plays the gap between O3 and O5. Both X2 and X3 can attempt to deny the pass to the two offensive players they are gapping. X4 and X5 three-quarter front the two low post players. X1 plays tight man-to-man defense against the point guard (O1).
So far, so good.
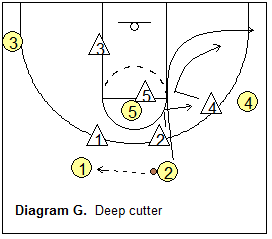
Look at Diagrams G and H below. How are you going to defend these cuts? You must have a plan for defending these offensive cuts. In Diagram G, when the cutter (O2) moves away from the ball (to the weak-side), X2 can stay with and bump the cutter, and deny the pass, and then switch with X4 once O2 moves to the corner. Now X2 has O4 and X4 has O2.
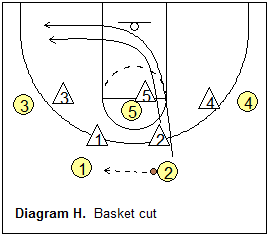

In Diagram H, a more threatening situation exists with the cutter moving ball-side. It might be easiest to have X2 stay with O2 man-to-man all the way to the ball-side corner.
Alternately (diagram I), when O2 passes to O1, X4 drops inside. So you could have X4 pick up the cutter O2 and go with him/her out to the opposite corner, while X2 then takes O4.
Coach Jim Huber (see video below) teaches this:
- If a cutter is moving away from the ball, let him go (less of a scoring threat).
- If a cutter is moving toward the ball, play him man-to-man - until you can hand him off to a teammate.
A more simple option is to have just one rule: once the initial match-ups are done (on that particular possession) and you have affected the offense's basic set, everyone plays man-to-man pressure defense, using the concepts of on-ball, deny, helpside, etc.
Now, see Coach Sar's 1-3-1 match-up zone, with all the details regarding how to rotate and defend cutters, handle screens, hi-lo, flash cuts, etc.