Basketball Defense - 1-3-1 Match-up Zone Defense
From the Coach’s Clipboard Basketball PlaybookDisclosure: This page contains affiliate links, which means that Coach's Clipboard receives a small commission (at no cost to you) if you make a purchase using these links.


Coach Sartini
Coach Sar ran this 1-3-1 match-up for years with his high school team. But first take a look at the general article on match-up zones. Also be sure to view the animation and this video from coach Tom Blackford.
An advantage of the match-up zone defense is that it may confuse the opponent in trying to figure out what defense you are playing. Also, it may affect the offense's basic set and get them out of their usual comfortable set. You can show this 1-3-1 match-up zone, and the offense may change to a 2-1-2, a 2-3, or a 4-out set, something they might be less comfortable with.
As in any aggressive man-to-man defense, pressure the ball at all times, front the low post, deny the passing lanes, bump the cutters, and give help on inside penetration.
One of the difficulties of a match-up zone is how to defend cutters. Players can get confused as to how to rotate and pick up cutters. Offensive players cutting from side-to-side are usually not a problem as the defenders can easily switch this. But confusion can occur when the cutters are moving from high to low, or when the offense overloads one side.
10 rules of the 1-3-1 matchup defense:
1. Use a 1-3-1 set with X5 in the middle.2. X5 plays O5 man-to-man at all times, while the other four defenders rotate around X5.
3. If O5 steps outside, X5 has him/her man-to-man.
4. Play the flash cut to the high post or elbow man-to-man.
5. When defending against the dribble, stay with your man and switch zones (not men).
6. Switch on screens.
7. Rules for covering shallow ball-side cuts (see below).
8. Rules for covering deep ball-side cuts (see below).
9. Rules for covering weak-side cuts (see below).
10. Play the baseline cut man-to-man.
Rule 1. Show a 1-3-1 match-up zone set with X5 in the middle.
By using the 1-3-1 set, you may be able to force the offense out of their usual 1-3-1, or 3-out, 2-in offense and into a 2-guard offense. In diagram A, X1 picks up the guard to his right and X2 gets the other guard. X3 drops down to get the player in his/her corner and X4 gets the opposite corner. X5 has the middle.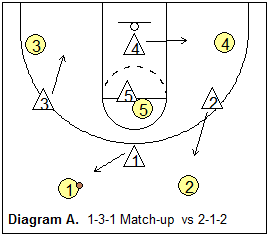
Rule 2. X5 plays O5 man-to-man at all times, while the other four defenders rotate around X5.
So if O5 goes down to the low post, X5 goes with him and plays him man-to-man. The other four defenders will rotate around X5.Rule 3. If O5 steps outside, X5 has him/her man-to-man.
In diagram B, X5 is man-to-man with O5 at all times, even if O5 steps out on the perimeter. X5 may sag back a little inside if he/she knows that O5 is not a good outside shooter. However, if O5 can shoot the outside shot, then X5 must play up (on-ball) on O5.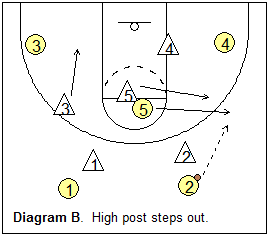
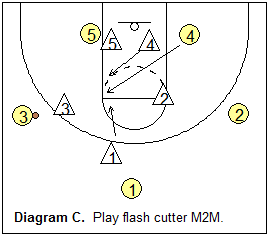
Rule 4. Play the flash cut to the high post or elbow and high-low post situations man-to-man.
In diagram C, X5 is man-to-man. But when the other post (O4) flashes high, X4 stays with him/her man-to-man and tries to get a hand in the passing lane to deny the pass from the wing. X1 drops down to help deny this pass as well. X1 faces the wing (and ball), putting his/her right foot alongside the left foot of O4. The important rule here is, X1 must not let O4 hook his leg, else when the pass goes back out to O1, X1 will not be able to recover, and O1 gets the open 3-point shot.Coach Sar says that the high-low post offense gives this defense the most trouble. Work on this a lot in practice (against the high-low set), and master how you are going to cover each situation that arises.
Against some teams who play a lot of hi-lo, it might be best to play both X5 and X4 man-to-man at all times against O5 and O4 - something to consider. Also see Diagram K below.
Rule 5. When defending against the dribble, stay with your man and switch zones (not men).
In diagram D, O1 has the ball and dribbles right. X1 stays with O1 and X2 takes X1's zone on top. You switch zones, not men.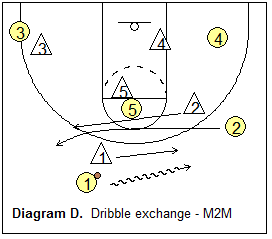
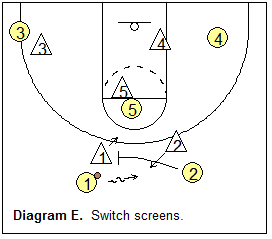
Rule 6. Switch on screens.
Switch screens on the perimeter. In diagram E, X1 and X2 switch men (not zones) on the on-ball screen. X2 takes O1 and X1 gets (steps under) the screener O2. X2 and X1 are in the same zones as they were at the start of the screen. They switched men, while maintaining their same zones.Rule 7. Rules for covering shallow ball-side cuts.
In diagram F, as the pass is made from O1 to O2, X3 moves to the help-side line. Then when the shallow cut is made, X3 slides over to the ball-side corner to pick up O4. X1 drops down and covers 03. X4 rotates out and picks up the shallow cutter 01. Notice how X1, X3 and X4 all rotate to the ball clockwise around X5.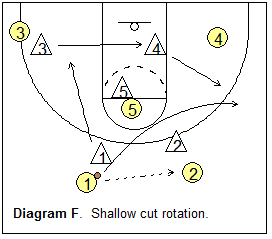
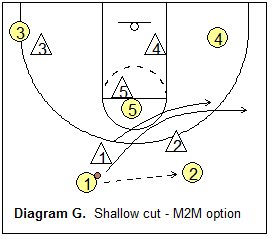
Optional man-to-man coverage for Rule 7.
See Diagram G. You could also decide to play this cut man-to-man with X1 staying with O1.
Whatever way you decide to play it, practice it and make sure your players understand their assignments.
Rule 8. Rules for covering deep ball-side cuts.
Diagram H shows a deep ball-side cut. As the pass is made from O1 to O2, X3 jumps to the help-side line. X1 drops down with the cutter O1. Since X3 is already in help-side position, X3 then takes the cutter O1 all the way to the opposite corner. X1 slides over and gets O3. X4 moves out with O4. Once again, as with defending the shallow ball-side cut, X1, X3 and X4 rotate around X5 to the ball.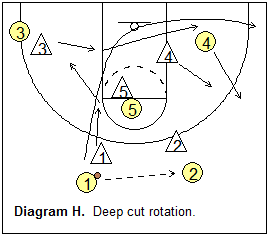
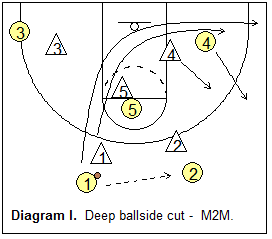
Optional man-to-man coverage for Rule 8.
See Diagram I. You could also decide to play this cut man-to-man with X1 staying with O1.
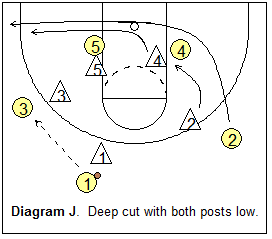
See Diagram J. Here's a situation with both posts low (a 3-out, 2-in set). The weak-side wing makes a cut to the ball-side corner to create an overload. Here X2 follows O2 down and then X4 picks up O2 and stays with him/her to the corner. X2 gets O4. Remember X5 is man-to-man with O5 at all times.
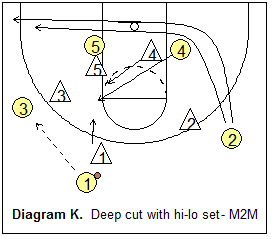
See Diagram K. Here's a similar situation with a deep ball-side cut except that O4 flashes to the high post or elbow to set up a hi-lo situation. You recall from Rule 4 that the flash cut is covered man-to-man, so X4 moves up to the high post with O4.
Now if the weak-side wing (O2) cuts to the ball-side corner, X2 will have to play this man-to-man to the corner, since X4 is occupied playing O4, and X5 never leaves O5 (always man-to-man).
Rule 9. Rules for covering weak-side cuts.
See Diagram L. A weak-side cut is non-threatening, being away from the ball. The baseline defender (X4) picks up this cutter (O2). X2 initially stays with and bumps the cutter and then flares out and picks up O4.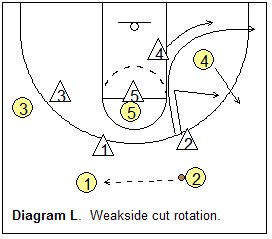
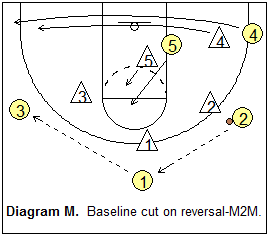
Rule 10. Play the baseline cut man-to-man.
See Diagram M. Baseline cuts on ball reversal must be played man-to-man.As the ball is reversed from O2 to O1 to O3, O5 cuts to the high post and O4 runs the baseline to the ball-side corner. You can see that X4 MUST cover O4 all the way to the corner man-to-man, as there is no-one else to cover O4 (remember that X5 is always man-to-man on O5).
A final note
However you decide to play these situations, make sure you practice all them so that your players understand their assignments. Remember your goals: pressure the ball at all times, front the low post, deny the passing lanes, bump the cutters, and give help on inside penetration.See the animation to better understand how these cuts are handled.
Coach Sar has added this: "One thing we eventually changed was to NOT DENY THE NEXT PASS. It became more like the packline style defense that you see used today. Our usual man-to-man defense was the on-the-line up-the-line style denying the next pass, so we wanted to show a different look."


